fbpx

Mama-san’s Chicken Corn Fritters

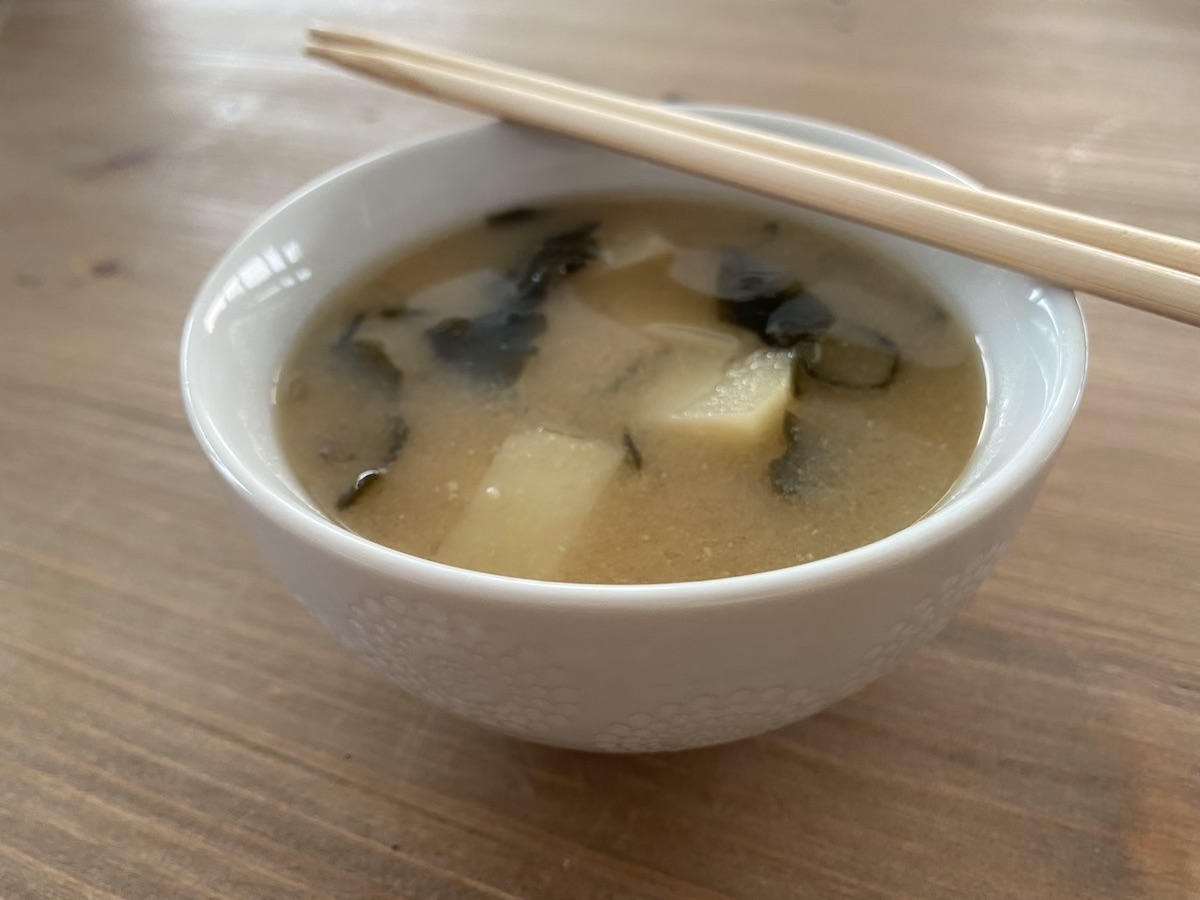
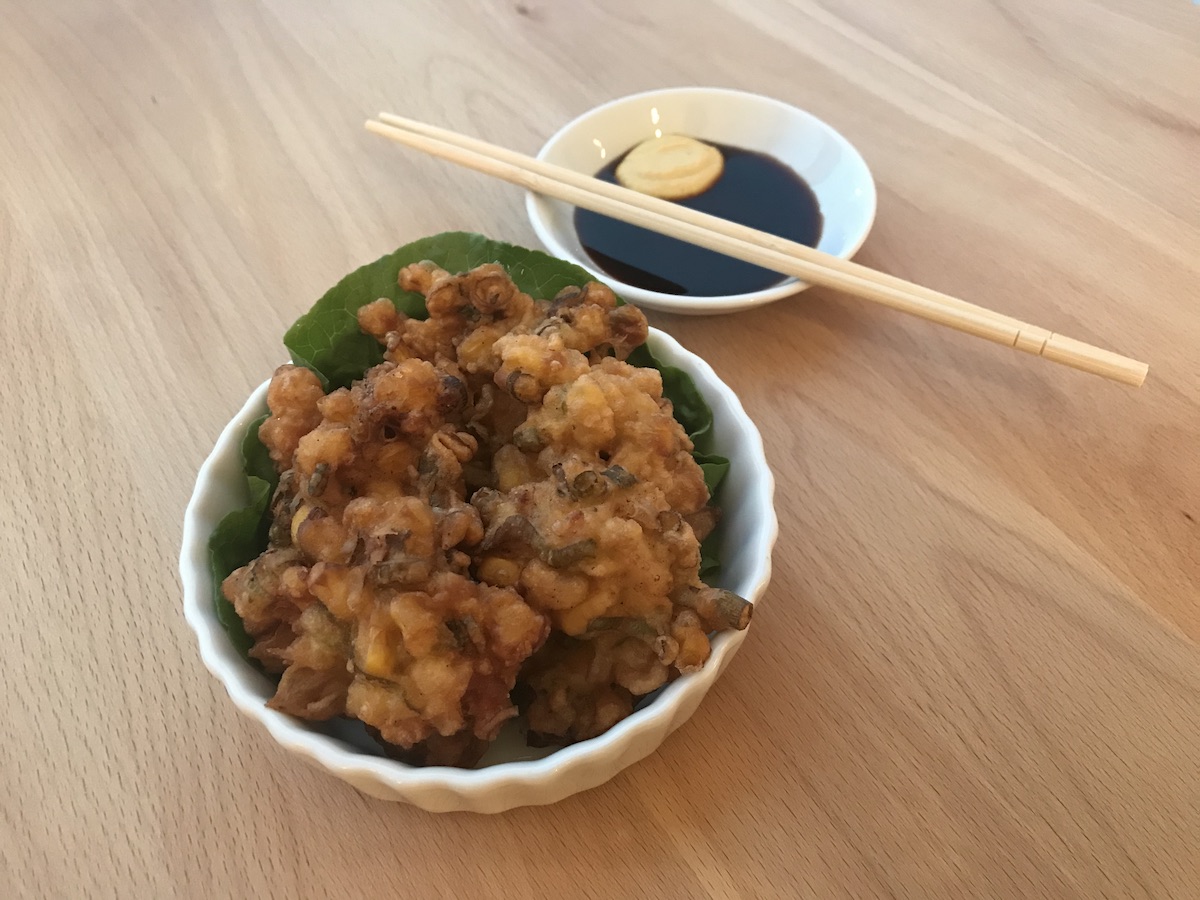
One of my favorite dishes growing up was my mom’s version of corn fritters. In fact, I loved them so much that I would make them for my own girls when they were younger! These corn fritters are hearty and pair well with lighter fare like miso soup and a salad like sunomono. The fritters also come together quickly, which makes for a fast, easy, and tasty(!) meal.

List of Ingredients for Corn Fritters

  • 1 Can of whole kernel sweet corn (15.25 ounce can = about 1 ½ cups) — (or equivalent amount of thawed frozen corn)
  • ~½ lbs chicken breast or thigh meat — cut into ½ inch cubes
  • 1 Bunch green onions — cleaned and chopped
  • ~5 Tbs. corn starch — doesn’t need to be exact, slightly heaping okay
  • ~5 Tbs. flour — doesn’t need to be exact, slightly heaping okay
  • 2 eggs
  • Milk or non-dairy substitute or water — use what is on hand to thin the batter
  • Salt and pepper — lightly sprinkle in salt and pepper
  • Oil for deep frying — I use an expeller pressed refined coconut oil that does not have the associated smell or taste of coconut. (Please do not use virgin coconut oil. It will flavor your food.) Peanut oil would be my second choice. You need enough to fill your pot with about 1 inch in depth.
    Healthy Traditions Expeller-Pressed Coconut Oil
    Healthy Traditions Expeller-Pressed Coconut Oil


    Both are great for frying as they tolerate high heat well.
  • Optional for serving — Coleman’s Mustard¹, Soy Sauce, or A-1 Sauce 

¹Mix a small amount of the dry mustard powder with water for desired consistency.

List of Tools

  • Medium bowl — for mixing batter
  • Spoon for mixing — I use a flatware soup spoon
  • 1 Tbs measuring spoon — to measure cornstarch and flour
  • Cooking chopsticks or tongs — for deep frying
  • Knife and cutting board
  • Heavy pot for deep frying — medium size is sufficient (~5 qt)
  • Skimmer or slotted spoon and resting plate — to remove excess stray batter pieces
  • Baking sheet or plate lined with paper towels — to soak extra oil from fritters
  • Serving plate

Making the Batter: Drain the can of corn and add to a medium mixing bowl. Cut excess fat and gristle from chicken. Cube chicken into ~½ inch pieces and add to the bowl. (Please keep the pieces small so they cook thoroughly.) Clean and chop the entire bunch of green onions and add to the bowl.

Measure about 5 Tbs cornstarch and 5 Tbs flour into the bowl. Lightly sprinkle with salt and pepper.

Mix the ingredients. Now add the 2 eggs and mix to begin to form batter. Thin the batter with milk/non-dairy substitute/water to make a batter similar in consistency to thick pancake batter. Start with about ¼ cup liquid and add more if necessary.

Preparing to Deep Fry: Add enough oil to cover the bottom of the pot to about 1 inch deep. Turn on the stove to medium high, which is typically a good place to start. (Note: Optimal burner setting is based on type of pot, type of stove gas or electric, size of burner.)

While heating the oil, prepare a plate or baking sheet with paper towels to drain the freshly fried fritters.

The oil is ready when a drop of the batter rises to the surface immediately.

Stir the batter before adding a spoonful (~1 ½ Tbs) into the oil. Try to scoop a nice balance of chicken, corn, and green onions in each spoonful. Add enough to fit the pot without overcrowding, about 8-10 spoonfuls. Sometimes, the batter may stick to the bottom of the pot and if this happens, loosen with chopsticks or with tongs so the batter can rise to the surface of the oil. Let both sides fry to a nice golden color. Once fully cooked and golden in color, take out the fritters and allow to drain on the paper towels. (Sometimes if the oil fills with a lot of stray batter pieces, remove with a stainless steel skimmer or slotted spoon.) Add more spoonfuls of batter and repeat until all the batter is cooked. When finished, be sure to move the pot of oil off the hot burner to cool safely.

Now enjoy your fritters plain, or with hot mustard and soy sauce (which I grew up on) or with A-1 (which the rest of my family loves)!

Also, don’t forget to submit a photo of your creations!  You can upload your photos using my Contact form!

Matcha Up Your Life

Adding matcha into your life is not only tasty but also has some health benefits! One such benefit is the high amount of catechin which is an antioxidant believed to help fight cancer. However, aside from the health benefits, matcha also tends to be lower in caffeine than coffee — but there is a catch. The caffeine in matcha is slowly released over a longer period of time:  this slow release helps you avoid a coffee crash, but the caffeine effects stay with you a lot longer. So be careful what time of day you enjoy matcha, if you are sensitive to caffeine.

With that in mind, let’s dive in! We will start with a basic guide for buying matcha, and then explore ways to add matcha throughout your week. (That goes beyond just mixing with water and drinking!)

Matcha Buying Guide: (highlights)

  • Country of Origin: For highest quality only purchase matcha using tea grown in Japan. The Kyoto and Aichi prefectures are regions known for their quality.

  • Color: The color should be bright and not dull. Look for matcha that is green without a brown or yellow hue.

  • Grind: Should be finely ground preferably by stone milling. Stone milling eliminates the risk of overheating the leaves during the grinding process. Overheating can alter the flavor.

  • Price: Admittedly, I love a good deal and unfortunately, matcha is one item where I have to resist that urge. While you absolutely don’t need the best, the cost can indicate the quality and flavor. And trust me, quality makes a big difference in flavor, so be prepared during checkout.

  • Grade (Ceremonial versus Culinary): Unfortunately, there is no standard grading system for matcha. Every brand has a system which makes things…well, complicated. But there are usually two broad categories.

    • Ceremonial: Typically the highest grade made from the 1st harvest (also known as Spring harvest) tea leaves. This is usually reserved for the traditional style consumption of mixing matcha with hot water. Ceremonial grade is smoother, sweeter, and less astringent, which is perfect when drinking without any extras.

    • Culinary: Typically a lower grade made from the later 2nd or 3rd harvest (also known as Summer and Autumn harvest) tea leaves. This is used for lattes or baking where the stronger, more bitter flavor can be beneficial.

  • Organic (my preference): Since matcha is a ground tea leaf, I prefer a brand that is organic to eliminate the chemicals.

While I don’t purchase top ceremonial grade (since I really don’t need that level of matcha), I do look for a 1st harvest matcha using less premium leaves. I have tried using different harvests but I prefer the flavor of the 1st harvest. My current brand that I am very happy with is Midori Spring “Emerald Class” matcha. I use it for drinking and for baking, while also shaving some of the cost.

Add Matcha to Your Favorite Recipes

I personally love taking my favorite recipes and modifying them for a fun uplevel. Not only can the color be pretty, but it is so delicious and oh, so easy! Here are some tips and recipes for you the next time you find yourself in the kitchen with some matcha in hand.

Baked Goods

Let’s take Sugar Cookies. Here is how I transformed the recipe into a wonderful dessert to serve after a meal.

Matcha Sugar Cookies

  • Add 1-2 Tbs of matcha to the dry ingredients
    Mix the dry ingredients in a separate bowl with the matcha and thoroughly mix together. (I use a whisk to do this.) You are set to add your dry ingredients into wet ingredients per your recipe!
  • TIP — My general rule is to add 2 tbs of matcha for every 2 cups of flour. This is a loose guideline based on taste AND grade of matcha. A culinary grade matcha may need less. Too much matcha and the bitterness will overpower so be careful the first time around.
  • TIP — Dough Consistency
    I typically add my matcha in addition to the original amounts called for by the recipe. However, you can help dough consistency by reducing the amount of flour by the amount of matcha you intend to use. An example would be if adding 2 tbs of matcha to a recipe, then reduce the amount of flour by 2 tbs.

Takeaway: Adding 1-2 tablespoons matcha to your dry goods and mixing is all you need to remember! Don’t be afraid to try cakes, pancakes/waffles, etc…There are a number of items that can be transformed by following the same basic rule.

Smoothies

Another favorite is adding matcha to smoothies. I have a favorite frozen drink that I make that is not only very simple but refreshing and tasty.

Matcha Smoothie

Matcha Smoothie Courtesy of Annalisa Pao
  • 1 Ripe Banana
  • 1 Cup Ice
  • 1 Cup Milk or Non-dairy Substitute or Water
  • 1 Tsp Matcha
  • 2 Tbs Hemp Seed (Optional, highly recommended if using water)
  • 1-3 Tsp Maple Syrup or Sweetener to taste (Optional)

Blend the above until desired consistency. Enjoy! (Sprinkle cinnamon on top for additional flavor and color!)

Takeaway: Adding ~1 teaspoon Matcha to your smoothie and blending should do the trick. However not all smoothies pair well.

Keeping it simple will help.

Cocktails

And finally, for those of you over 21…..how about a Matcha Whiskey Sour? My daughter (Yes, she is over 21 and certified in bartending!) crafted this for me!

Matcha Whiskey Sour

Matcha Whiskey Sour Courtesy of Christina Pao
  • 4 Tsp Freshly Squeezed Lemon Juice
  • ¼ Tsp Matcha
  • ~½ oz Simple Syrup
  • 1½ oz Whiskey

Add all the ingredients and dry shake well. (Dry shake = shaker is without ice) Once the matcha is fully incorporated, add ice to the shaker and shake again! Pour into a serving glass (and if you want, add a maraschino cherry to add a pop of color to this beautiful green cocktail). Enjoy!

Takeaway: Adding ¼ tsp matcha adds color and nice flavor to a cocktail but dry shake to avoid clumping.

Those are just a few ideas but there are so many more. For instance, my daughter Annalisa makes amazing matcha ice cream (which might have to be included in a video during one of her breaks)! Experiment and see what you come up with! And, as always, let me know how it goes!


As an Amazon Associate I earn from qualifying purchases.


Mama-san’s Country Style Miso Soup

Today’s video covers miso soup but with a twist! Instead of tofu and green onions which is the traditional style, I show a country style of miso soup with potatoes and yellow onions. My mom made this for us growing up! Miso soup is a great dish to prepare throughout the year. And, when served with sushi and sunomono (from my earlier videos!), you have a complete meal! (Not including dessert, but we will cover that next week.)

Miso soup may seem a bit complicated because of the ingredients, but don’t panic. It’s actually quite simple. I will cover the basics below.

QUICK DEFINITIONS:

  • Katsuo = dried bonito (A type of fish)
  • Kombu = long strips of dried kelp
  • Wakame = cut and dried seaweed
  • Dashi = soup stock (Can be made of any combination of powdered fish, dried fish packets, powdered kombu, and/or kombu strips. I use katsuo as my powdered/dried fish of choice.)

List of Ingredients for Country Style Miso Soup

For Traditional Style Miso Soup see below.

  • 1 Pouch of Dried Katsuo — Katsuo, also know as dried bonito, is a type of fish used in my stock today. This can come in packets of dried powder or pouches of dried fish. I prefer the pouches of fish because I feel the stock has a richer flavor but I have used both with success. And if you use the powder version, just make a mental note if there is salt added or not so you can adjust accordingly. Since not all powdered packets are the same, follow the directions on the packaging for 5 cups of water. Also, note that it’s very easy to add more powder so it is fine to undershoot the measurements initially.

    Katso Pouch (Left) / Dried Bonito Packet (Right)
    Katsuo packaging

    There are several kits for dashi soup stock available on Amazon that include the dried powder or fish.

  • 2-3 pcs Kombu (approximately 5 in. long) — Kombu is a type of dried kelp used to form the dashi (i.e., stock). You can get kombu at any Asian market or on Amazon. You will notice a white powder on the kombu/kelp but that is totally normal. No need to worry, use as is! Look for kombu from Japan but any brand works.
    Kombu
    Kombu packaging
  • 2 Tbs. (I use slightly heaping measurements) of both Red and White Miso — Miso can be confusing because there are so many to choose from. I use Cold Mountain, red and mellow white. These have great flavor and better yet you can usually find this brand at the local grocery store. I have seen Cold Mountain at Safeway and Whole Foods. The blend of red and white miso makes for a nice flavor, but you can easily use just one or the other. I would say purchase what is easiest and experiment.  Amazon also sells red miso paste and white miso paste.
  • 2 Medium Russet Potatoes (About 2 cups cubed) — Red potatoes work well, too. And better yet, if you use red potatoes you don’t need to peel them!
  • 1 Yellow Onion (small is okay!) — Only a small amount is used!
  • ⅛ Cup Wakame (Cut and dried Wakame/Seaweed) — Wakame is a type of seaweed sold in cut and dried form in packages, such as this one on Amazon. Some packages have freeze dried tofu and green onions (or other extras) along with the wakame! For today’s soup, I kept it simple with the basic wakame without extras.
    Wakame Packages
    Wakame packaging
  • 5 cups water — You may need more to add after simmering the stock or to adjust the flavor.

For Traditional Style Miso Soup

Use Tofu and Green Onions Instead of Potato and Yellow Onions

  • ½ Block of Tofu (instead of potato) — Tofu comes in different softness. There is the silken or very soft tofu to extra firm. I typically use firm tofu because it is easier to purchase but use whatever texture you enjoy. Probably best to stay away from the extra firm, though.

    Cutting the Tofu: Rinse the top of the tofu container and slice open to drain out the water. Now take the block out of the container and place it on the cutting board. Cut the block in half. Set aside the portion not being used.
    When cutting into cubes for miso soup, I take half a block of tofu and cut lengthwise into 4 slices. I then lay those down two at a time and cut into 3 long strips again working lengthwise. Now turn the strips and cut into half. Those halves will be cut into 3. Now you have cubes. Repeat with the other remaining 2 slices. (Add tofu when instructions call for potatoes.)

    Preserving Extra Tofu: Take the unused block and place in a container that has a tight fitting lid. Fill the container with water (ideally filtered) until the tofu is fully submerged. Cover with the lid and place in the refrigerator. This will keep nicely for future use. Try to use it within a week.

    Cutting Tofu

  • 2 or 3 stems of Green Onions (instead of yellow onion) — Chop the green onions. (Add green onions when instructions call for the yellow onions.)
    Preserving Extra Green Onions: If you find you have chopped too much green onion, place the extra as a thin layer in a Ziploc bag and place inside your freezer. This keeps nicely with a decent flavor until the next time you make some more soup! And when frozen as a layer, you can break off what you need easily.

List of Tools

  • 3 quart pot
  • Ladle and resting plate
  • 1 Tablespoon measuring spoon
  • ⅛ cup measuring cup
  • Chopsticks (The chopsticks are not necessary but helpful, you’ll see why later!)
  • Vegetable peeler
  • Knife and cutting board
  • 2 cup measuring cup (Just to loosely measure the quantity of cubed potatoes)
  • Small serving bowl (I use a rice bowl. I have to admit that I don’t even own any traditional miso soup bowls!)

Making the Dashi (i.e., Stock)

Okay, now let’s get the dashi (i.e., stock) started. While it’s simmering, we will prepare the other ingredients….and then the dashi will be done!

  1. Add the 5 cups of water to your 3 quart pot.
  2. Add 1 katsuo pouch and 2-3 pieces of kombu. This is a popular method for making the dashi. (But don’t be afraid to make this according to your preferences whether that means kombu only, fish only, powdered fish, powdered kombu, etc…)
  3. Then, bring the pot to a boil and immediately drop to a simmer, making sure that everything is submerged. Cover your pot, leaving the lid slightly ajar. Let that continue to simmer and check once in a while.

Prepare the Potatoes and Yellow Onion

(Tofu and green onions covered above)

  1. Peel the yellow onion and set aside.
  2. If using russets, please peel. But if using red potatoes, go ahead and leave the peel on!
  3. Very thinly slice the yellow onion. I use just a tiny bit. You can easily add more if necessary.
  4. Cut the potato into ½ inch cubes. You really want the cubes to be about the same size so they cook evenly together.

Back to the Dashi (i.e., Stock)

Now our dashi should be done! (It should simmer for about 15 minutes.) Remove the kombu and the pouch using chopsticks or tongs. You can dispose of the katsuo pouch and kombu. As you can see, the water level dropped dramatically. Just add back enough water to around the starting level.

Let’s add our miso! This is where the measuring spoon and the chopsticks come in. You will be using two heaping tablespoons of both red and white miso. When you do this, take your chopsticks to break apart the miso as it enters the stock from your tablespoon. This is to avoid a big blob of miso sitting at the bottom of your pot.

Mixing in miso
Mixing in miso

Now, we can add in about 2 cups of potato (or ½ block of cubed tofu). I then added about ⅛ cup of wakame. (add more if you would like, just be careful since it’ll expand!) Add the onions (or chopped green onions) and start up the stove to bring the soup to a boil. Boil for between 30-60 seconds and then turn off the stove, cover and leave on the burner. The potatoes will be cooked after 30 minutes and your soup is ready! (If using tofu, your soup is ready immediately!)

And FYI, miso soup is very forgiving. At this point, try a little, and, if the flavor is weak, add some more miso. Or if the flavor is too strong, add some water. And that’s it! And when you are ready to eat, just reheat!

By the way, my family loves to eat miso soup with Tabasco! Definitely give it a try!

Hope you enjoy!


As an Amazon Associate I earn from qualifying purchases.

4-Ingredient Cucumber Salad (Sunomono)

Today, I released a video for a Japanese cucumber salad called sunomono. The recipe is vegan-based, and uses only four core ingredients. However, if you want to add something extra, I show you how to add imitation crab or wakame (a type of seaweed). Sunomono is a great starter dish when serving sushi (see my Seattle roll recipe here)!

4-Ingredient Cucumber Salad (Sunomono)

List of Ingredients

(An Amazon shopping list is also available here.)

Sunomono (Cucumber Salad) Ingredients
  1. ¾ Cup Rice Vinegar — I love Mizkan! Look for the label in my picture above! 
  2. ¾ Cup Sugar — Any evaporated cane sugar or white sugar will do.
  3. 1 Tsp. Kosher Salt — Kosher Salt is great at drawing out the water from the cucumber while still being easy on the palate. Use Diamond Crystal if possible; and if using Morton’s, know that you might need to use less salt than I do!
  4. 1 English Cucumber (Or ~5 Persian Cucumbers) — I use English cucumbers, but you can also use Persian cucumbers. If using English cucumbers, you’ll have to peel the cucumber! In my picture above, the English cucumber is larger and plastic-wrapped; the Persian cucumbers are smaller.
  5. Imitation Crab (optional) — This is usually found in the freezer section of Asian markets.
  6. Wakame (optional) — This is a type of seaweed I use for miso soup. Asian markets carry this, too.

Tools

(An Amazon shopping list is also available here.

  • 2 medium bowls
  • Colander 
  • Measuring cup 
  • Chopsticks (or something else to stir with)
  • 1 teaspoon measuring spoon 
  • Vegetable peeler
  • Cutting board
  • Knife
  • Serving bowl

Make the dressing 

First, let’s measure the vinegar and sugar. While I used ¾ cup rice vinegar and ¾ cup sugar to make my dressing, I definitely could have made less. I only used about a ¼ cup of my dressing to make my sunomono. Sometimes, if you don’t draw out enough water from the cucumber, the flavor will be diluted so you need to add extra dressing.

I might recommend starting by making less dressing, while still maintaining the 1:1 ratio of vinegar and sugar (e.g., ¼ cup rice vinegar to ¼ cup sugar). But don’t worry if you have extra because you can store it in the refrigerator! The saved dressing is great for making sushi rice or more sunomono. You can also use this mixture to pickle vegetables! (I will cover pickle making in another video.)

Once you measure out your vinegar and sugar, mix until the sugar is fully dissolved and set aside.

Prepare the cucumbers

Now, let’s prepare your cucumbers! Persian cucumbers are great if you can find them because they don’t need to be peeled. I use an English cucumber in the video because it’s the easiest to find in local grocery stores. 

First, wash your cucumber(s) and peel (if using an English cucumber). When you peel the English cucumber, leave some strips of the skin on to add some color and texture to your salad (see picture below).

Peeling the Cucumber for Sunomono

Next, you’ll need to thinly slice the cucumber. I first cut my cucumber in half lengthwise, then through the diameter lengthwise. I then slice each of these quarters into small pieces, such that each slice is the shape of a half-moon.

Salting the Cucumbers

Now, sprinkle about a teaspoon of Kosher salt into the bowl with your cucumber slices. Work the salt into the cucumber by gently squeezing the slices between the fingers. This not only softens the cucumber, but also removes some of the water. Continue this until a good amount of the water is removed from your cucumber slices. At this point, your cucumber slices should be softened, but still have a bit of life to them. 

Taste a piece for saltiness and texture. Don’t worry if your cucumber is too salty! You would just want to give the cucumbers a quick rinse in a colander before we remove the remaining water. 

To remove the water, squeeze handfuls of the cucumber slices over the sink. I usually put a colander underneath to catch pieces that might drop from my hands. Once you are finished squeezing a handful, put the squeezed cucumber slices in another bowl. Continue until you have squeezed all of the cucumber. 

It’s time to season the cucumbers with your dressing! Start with just a bit—around ¼ cup—and keep adding to your taste. I saved the rest of my dressing in the fridge for the next time I make sunomono.

Time to plate!

Add your fully dressed cucumbers to your serving bowl! I typically stop here and don’t add any extras, but, if you’d like to add some color, you can use some wakame or imitation crab. 

If you use wakame, you will want to rehydrate a tablespoon of the wakame in water until it is reconstituted. Then, drain the wakame from the water, give a light squeeze, and add it to your cucumbers. Give a good stir.

If you use imitation crab, take one piece and peel skinny strips from it. Tear those pieces in half, add them to your cucumbers, and give a good stir. With your extra crab, you can always make a California roll now that you’ve mastered sushi making from my last video. 😋 

And that’s it! Enjoy!

The 7-Ingredient Seattle Roll

Yay! Today, I have posted my kick-off video on how to make a 7-ingredient sushi roll where you learn everything in under 7 minutes!

There was a lot of content in a very short amount of time, so hopefully this post helps clarify any confusing points. Let’s just go down the highlights!

List of Ingredients

(An Amazon shopping list is also available here.)

  1. 3 Cups Uncooked Medium Grain Rice — I like Nishiki since it’s a nice compromise between taste and cost. Can use any brand, but I would definitely suggest branching out in the future.
  2. ¼ Cup Rice Vinegar — Mizkan is my favorite. I like this particular label (see photo below) but any brand can be used. Just know that different brands have subtle differences.
vinegar
  1. ¼ Cup Sugar — Evaporated cane sugar or white sugar. Either will work.
  2. ~½ Tsp. Kosher Salt — Please use kosher salt! And if you can, purchase Diamond Crystal. I promise it’s worth the effort. Morton’s Kosher salt is slightly different so be careful, and use sparingly.
  3. 1 Package of Smoked Salmon — Cold smoked.  It’s sometimes referred to as Nova smoked salmon.
  4. 1 Block of Cream Cheese — Any brand in the big block. Please do not get whipped cream cheese! We will need to cut it into strips.
  5. 1 Package of Nori — Any brand with perforations. Most packages are sold with perforated nori, so don’t worry too much.

List of Tools

(An Amazon shopping list is also available here.)

  1. Rice Cooker (optional) — Helpful and highly recommended. (I bought mine at Costco!) 
  2. Rice Rinser — Any bowl will do.
  3. Rice Paddle — Can be purchased in any Asian market.
  4. Large Bowl — Big enough to mix the rice without making a mess, but shallow enough to let the rice steam out while mixing.
  5. Measuring Cup and Stirring Utensil — These are for stirring the vinegar and sugar. I use chopsticks as my utensil of choice.
  6. Bamboo Sushi Mat — Can be purchased in any Asian market. Mine measures 9.5 inches by 8 inches.
  7. Sharp Knife and 2 Cutting Boards
  8. Sponge (optional) — To be used when cutting the sushi, but not necessary. Cutting sushi requires a wet blade so using a saturated sponge is very helpful. However, running your blade under a faucet will do!
  9. Serving Plate — I like to use a cutting board, but any plate will do the trick!

Prepare the Basic Sushi Rice

Prepare 3 cups of uncooked rice (measured by a rice cooker measuring cup)¹ by first rinsing the rice until the water runs clear. (Rinsing helps remove the starch which will give better texture.)

Drain thoroughly. If using a rice cooker, pour the rinsed rice into the rice pot. Fill the pot with water just under the 3 cup line for white rice. Cooking the rice with a little less water will help with the final product. The sushi rice should not end up mushy. Cook on the normal white rice setting, not the sushi setting.

¹ A rice cooker measuring cup and is approximately ¾ cup using standard measuring cups.

Mix together the ¼ cup rice vinegar and ¼ cup sugar and stir until dissolved. Then, set aside. Often it takes time for the sugar to dissolve into the vinegar, so it helps to stir the vinegar from time-to-time as you’re preparing the other ingredients.

When you’re ready to roll the sushi, move the rice to your large bowl. Spread out the rice a bit in the bowl to let it steam out. Now add the vinegar-sugar mixture. Sprinkle a little bit of kosher salt and mix until the vinegar is fully absorbed. 

Once the vinegar is absorbed, I like to do a taste test. Typically the only adjustment needed is a tiny bit more salt. Please remember that sushi rice is subtle in flavor! It is better to be conservative on the flavor with the rice than to over do it.

Rolling the Sushi

Now it’s time to prepare the salmon and cream cheese. Separate the salmon into usable slices. For the cream cheese, cut an ¼ inch slice from the block from the long side. Cut the slice into two to make two long strips. Continue until you cut the entire block of cream cheese. Some of your strips then need to be cut in half lengthwise to make four pieces. (See picture below)

Cream Cheese

Once you are happy with the rice, prepare the nori. There is a shiny side and a rough side. The shiny side faces down toward the bamboo mat. (That is the side that you will want to show after rolling.)

Look for the perforations. There is always one row that will be a little shorter. This is the side that you will want to tear from! Fold off the first full row from that side. (See the photo below.) Tear off this 1.5 row piece, and save it for another day. (You can make onigiri!) Place the larger piece shiny-side down on the mat. 

Placing the ingredients

With the nori on the mat, start spreading the sushi rice on top. Start from the first perforation and spread to the bottom. You can leave a little wiggle room on the sides and bottom. The rice is loosely spread in about a ¼ inch thickness.

Take one piece of salmon and spread close to the bottom edge of the rice closest to you. You may need to tear a shorter piece of salmon to cover across the full length. Now take 1 long piece of cream cheese and one of the half pieces to cover across the full length of the mat. Place the cream cheese next to the smoked salmon.

Grab the edge of the nori closest to you along with the edge of the bamboo mat with your index finger and thumb. Hold the salmon/cream cheese in place with the rest of your fingers.

Now very calmly roll away from you. Try to get a tight roll, and then firmly squeeze. Lift the edge of the bamboo mat from the center and roll a little bit more and squeeze. Continue this motion until the nori is fully wrapped around the roll. 

If the nori is not fully stuck to itself, place that side with the seam down on a cutting board. It should be set once you are finished rolling. If not, go ahead and wet your finger and carefully wet the portion of the nori that is not stuck and press down.

Once all the rolls are completed, (I was able to make 6 rolls using all of the rice!) it’s time to cut them! Using your sharp knife, wet the blade (either by wiping the blade with your saturated sponge or by running the blade under the faucet). Take one of your rolls, and cut it in half. Take a half and cut into four pieces. Do the same with the other half and you will have 8 pieces per roll. Remember to continue wetting your blade whenever the nori begins to stick.

Congratulations! It’s time to plate and eat! 🙂